Drupal is powerful and flexible enough to allow you to make a theme of any complexity. The system gives you countless ways to solve the issues that arise, but you need to know how Drupal works with themes to be able to choose the best option. By knowing the principles of theme creation, you can minimize your code and make subsequent maintenance easier.
This does not mean that you have to learn all of Drupal from beginning to end just to make your theme. These chapters will cover issues related to working with design, and you can learn only the ones you need. Some documents are designed for technically trained users, others are general in nature, but you will need knowledge to understand most things:
- HTML and CSS
- JavaScript and jQuery (if you are going to make a theme that supports those scripts)
- PHP (this is not necessary, but in many situations knowing PHP will help you better understand what you are talking about)
- Drupal terminology
Try to adhere to coding standards when developing a theme – this will keep the code of the theme clean. Before creating a theme, you need to imagine the goals and capabilities of the site for which you are making the theme. Knowing certain requirements is much easier to develop a new theme than designing one based on general notions.
How do I create a theme?
To make your theme appear in the admin panel and become available for connection, simply create a folder with its name in the directory (recall that custom themes should be in your_sites/sites/all/themes) and put a file with the extension .info in it.
This is the required minimum. In addition to it, the theme must include:
- template.php – the file in which the php code will be inserted to expand the capabilities of the topic (to add non-standard templates, change the code of individual elements, for example breadcrumbs)
- Templates tpl.php – files in which we actually work with the code of the pages and their individual elements. It is in them that will happen tematization
- css and js files – normal files with scripts and design
In general, this minimum is enough for theming almost any site. Next, let’s examine the contents, the purpose of the files, and the structure of the theme in more detail.
File .info
Syntax
Its name must exactly match the name of the folder in which it is located, because this is the system name of the theme.
You can use lowercase English letters and twitch marks in his name.
For example, I will create a theme called mytheme. It will look like this:

Content
In the minimum configuration its contents will look as follows:
name = My Theme
description = Special theme for the site. By Vaden Pro /
version = VERSION
core = 7.x

; ---------STYLESHEETS---------
stylesheets[all][] = css/style.css


; ---------REGIONS---------
regions[header] = Header
regions[sidebar_left] = Sidebar left
regions[content] = Content
regions[footer] = Footer

; Information added by Drupal.org packaging script on 2015-10-15
project = "drupal"
This means the following:
- name – the name of your theme, which will be displayed in the Drupal admin panel
- description – description, which will also be displayed in the administrative panel
- version – version of the theme is displayed next to its name, if you write here VERSION, it will match the current version of the engine, if you write your own value (for example 7.X-1.1) it will be displayed.
- core – as name is a mandatory parameter, it indicates for which version of Drupal created our theme.
- ;something is – comment syntax in info file, semicolon at the beginning of the line
- stylesheets[all][] = css/style.css – include css files into theme (more about include js and css files into theme’s template)
- scripts[] = js/scripts.js – include js files in the same way, if necessary
- regions[header] = Header -create the key areas of our theme. See below for a more detailed description.
- project – says what platform the theme is created for
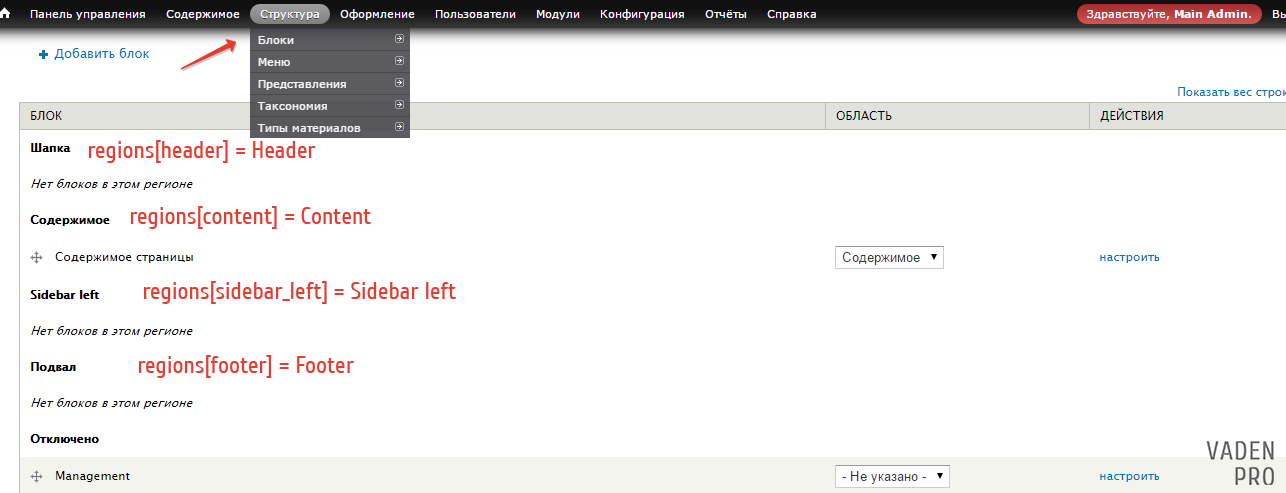
A couple of words about creating regions for a theme. Suppose we have a typical site with the following structure:

Accordingly, we want to be able to display blocks of the site in these regions, this line in the file .info:
regions[header] = HeaderThis is how they are created. If you look at our example, after enabling our default theme, the following blocks will be available to us in the theme:

In addition to the above minimum, you can still add to the info file:
- screenshot – allows you to set a preview of the theme for the admin panel, just specify the path to the picture:
screenshot = screenshot. png - features – allows you to add additional features to the theme settings, allowing you to override the global theme settings, they include the following:
features[] = logo
features[] = favicon
features [] = name
features [] = slogan
features [] = node_user_picture
features [] = comment_user_picture
features [] = comment_user_verification
features [] = mainjnenu
features [] = secondary_menu- php – if a specific version of php should be used in the project, it can also be specified directly, for example: php = 5.3
- settings – allows you to specify additional settings for the theme, more about this we will talk in a course on professional temizatsii Drupal, now just enough to know that there is such.
Templates .tpl.php
Also to work with the theme we minimally need to configure a template page, the remaining files tpl.php connect in the course of further theme site, described in the following lessons.
For ease of future work, create a folder templates inside our theme, which will store all our files tpl.php.
html.tpl.php
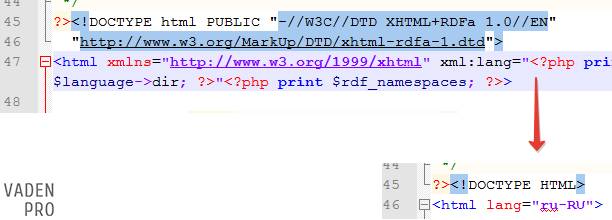
Suppose we want to make a site using html 5, which means we need to override the standard Drupal !DOCTYPE (more about html page structure). To do this, we need to connect an appropriate template.
You can simply create a file with this name in our folder and set the encoding to UTF-8 without BOM, but it is better to take the source code from the core, to do this, go to the root of the site modules/system, there find and copy the file html.tpl.php, then paste it into the appropriate folder of our topic, open it and make the necessary changes:

The code to which we replace the opening html tag and !DOCTYPE to connect html5:
<!DOCTYPE HTML>
<html lang="ru-RU">
It is also in this template we get access to the head tag of the entire site. For example, if we need to add a bunch of social media buttons to the pages of the site, it is here we can add their code to the head tag.
page.tpl.php
Similarly to the previous template can be copied from modules/system/page.tpl.php, or you can just copy and rename the template html.tpl.php, because unlike html in page we will already do the first layout of our page, which means we better write the code by hand (a couple of words on how to create the structure of the page in html 5):
<?php if ($page['header']): ?>
  <header>
      <?php print render($page['header']); ?>
  </header>
<?php endif; ?>

<?php if ($page['sidebar_left']): ?>
  <aside class="leftSidebar">
      <?php print render($page['sidebar_left']); ?>
  </aside>
<?php endif; ?>

<section class="mainContent">

    <?php if ($messages): ?>
      <div id="messages">
          <div class="section clearfix">
              <?php print $messages; ?>
          </div>
      </div>
    <?php endif; ?>

    <?php if ($tabs): ?>
      <div class="tabs">
          <?php print render($tabs); ?>
      </div>
    <?php endif; ?>

    <?php if ($breadcrumb): ?>
      <div id="breadcrumb"><?php print $breadcrumb; ?></div>
    <?php endif; ?>

    <?php print render($page['content']); ?>

</section>


<?php if ($page['footer']): ?>
  <footer>
      <?php print render($page['footer']); ?>
  </footer>
<?php endif; ?>
Let’s break down the code in a little more detail:
In order to display a specific region of the theme in the page template, a string is used:
<?php print render($page['header']); ?>As you can guess [‘header’] is simply taken from the .info file, I remind you that the region is defined as [‘header’] in it (note that in the page template we add [‘header’] in [header]):
regions[header] = HeaderSimilarly, output all the other regions.
Next, add the desired wrap to it (if we want all the blocks from the header region to be in the tag <header></header>, that’s the tag to add).
And put a check in php, so that if we have no content in a particular region (as now, when the topic is just created and all the blocks in it are disabled):
<?php if ($page['header']): ?>
...
<?php endif; ?>
We’ve already figured out where we take the condition from, everything inside this tag will not be rendered on the page if there are no blocks in the [‘header’] region. So we got the result:
<?php if ($page['header']): ?>
  <header>
      <?php print render($page['header']); ?>
  </header>
<?php endif; ?>
We did this with all the regions in the example and added it to the page output:
Breadcrumbs
<?php if ($breadcrumb): ?>
 <div id="breadcrumb"><?php print $breadcrumb; ?></div>
 <?php endif; ?>
System messages (you will need them later to work with themization)
<?php if ($messages): ?>
<div id="messages">
<div class="section clearfix">
<?php print $messages; ?>
</div>
</div>
<?php endif; ?>
And tabs for easy navigation
<?php if ($tabs): ?>
<div class="tabs">
<?php print render($tabs); ?>
</div>
<?php endif; ?>
So, congratulations, we have already created the skeleton of our new theme. For someone this may even be enough, because by placing in their own arbitrary regions with the desired markup Drupal blocks we can already operate quite flexibly with the structure of the page.
template.php
Also a must-have file. Copy any of our already created files tpl.php, delete code from it, rename it and put this file in the root of the theme. Open it, put an open tag <?php in the beginning of the file (because it will contain only php code) and first let’s add the code that removes the system link to drupal.org from the page output. Now the contents of template.php looks like this:
<?php

//Remove automatic generation of a link to a Drupal site in the theme:
function mytheme_html_head_alter(&$head_elements) {
  unset($head_elements['system_meta_generator']);
}
style.css
As we remember, we also plugged the css file from the .info file into the theme:
stylesheets[all][] = css/style.css
And so we just create a folder css and put our file style.css.
To summarize
This is where the creation of the skeleton of our future theme can be considered complete. Next we will work on the design of specific individual parts of the site.
For convenience, let’s add empty folders to our theme at once:
- js – Here we will put script files if necessary
- img – for pictures
- views – for tpl.php files, which will be used to topicize the preconceptions (to avoid confusion it is better to separate them from the usual tpl templates)


